How to Add a User on Arch Linux
User management is the most needed utility in any operating system because it makes your system secure and provides you an opportunity to assign the right privileges to the right ones. The users can make a lot of changes to your system according to the rights they have. Therefore, it’s very necessary to have a very close look at each activity that is performed by the users. Thus, this guide elaborates on the method to add the new users to the Arch Linux system and how to manage them. Before moving towards the addition of users in the Arch Linux system, we need to make sure that the group is already enabled. To do so, we use the following “visudo” command with “sudo”. This is typically used to make changes to the sudoers file:
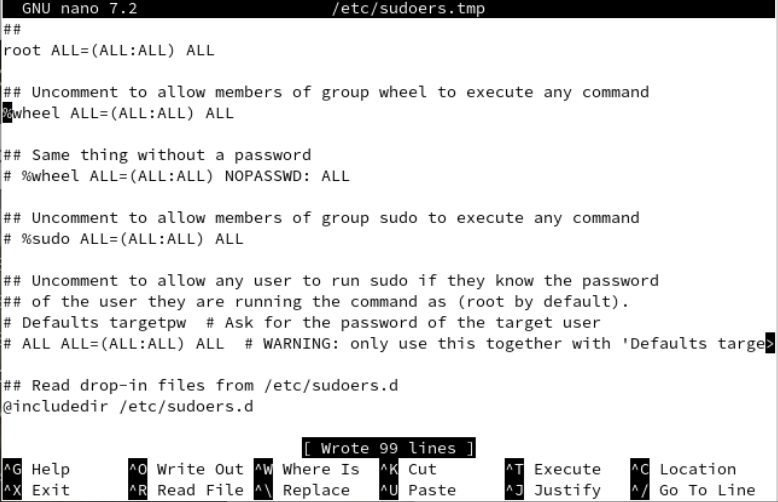
[user@host ~]$ sudo EDITOR=nano visudoThe sudouers file is launched in the “nano” editor. You will find the “wheel” group in the following illustration. Uncomment it and save the file to update the changes. Use “Ctrl-x” to exit.
Add a User
Now, we add a new “test” user to the Arch Linux system using the “useradd” instruction with the “sudo” rights. This instruction doesn’t take anything in return which indicates that the user is created.
[user@host ~]$ sudo useradd testNow, it’s very necessary to secure an account that is just created. For this, we establish a new user and add a new password. Therefore, we utilize the shell’s “passwd” command along with the user “test” as our input. You are prompted by the terminal to enter a new password. After providing the password twice, it is updated successfully.
[user@host ~]$ sudo passwd testNew password:
Retype new password:
passwd: password updated successfully
In case you want to perform the process of user addition to arch Linux along with setting its password at once, you can do so by modifying the useradd instruction. For this, you should use the “-m” and “-p” flags in the instruction. The “-m” flag can be utilized to name a new user while the “-p” option can be used to set the password for the user to be created. For example, we create a “dummy” user with the “dummy123” password via the useradd instruction in the following:
[user@host ~]$ sudo useradd -m dummy -p dummy123The other thing that you can achieve using the useradd instruction is to set the custom directory for a new user using the “-d” option with the path to the directory. The following instruction shows that we created a “new” user and a “new” password and set its custom directory as “/tmp/new”:
[user@host ~]$ sudo useradd -d /tmp/new -m new -p newThere are a lot of groups which are available in Arch Linux to perform the different functions according to their group types. To add a user to a particular group in Arch Linux, the useradd command comes up with the “-G” option to add a particular user to any group. For example, the following instruction adds a new “blue” user in the wheel, audio, and video group while creating:
[user@host ~]$ sudo useradd -G wheel,audio,video -m blue -p blueThere is also a way to add the system users in Arch Linux using the useradd instruction. For this, you need to use the “-r” option with the “-s” flag followed by the path to the “fish” directory, i.e. “/usr/bin/fish”. The “hell” user is created as you can see from the attached command. The output of this instruction generates a warning.
[user@host ~]$ sudo useradd -r -s /usr/bin/fish helluseradd: Warning: missing or non-executable shell ‘/usr/bin/fish’
You can also do it if you wish to confirm the outcome of the aforementioned instruction. For that, try using the following “su’ instruction with the name of a user that you just created. It might show you a warning.
[user@host ~]$ sudo su - hellsu: warning: cannot change directory to /home/hell: No such file or directory
After that, try the whoami one-word instruction on the shell. You will see that it returns the name of a system user that you just created.
[user@host ]$ whoami
hell
User Modification
While using the arch Linux and creating new users, you should have a piece of knowledge about the user properties and a way to modify them. Consider the scenario where we want to rename the “test” to “test1” user. For this, we use the usermod instruction with the “-l” option followed by the new name and then an old name as shown in the following attached command:
[user@host ~]$ sudo usermod -l test1 testNow, if you want to set the expiry date for a newly created user account, you can also set that using the usermod instruction followed by its “—expiry date” option. The option follows the date and then a username. The “test1” is our new user name in this case.
[user@host ~]$ sudo usermod --expiredate 2022-01-23 test1Now, if you want to add your user to the additional groups, you can do so by using the –append option in the usermod instruction followed by the –groups option with the group names and the name of a user to be added. The wheel and users are 2 groups while the test1 is a user.
[user@host ~]$ sudo usermod --append --groups wheel,users test1To modify the default shell that is used by a user, you can use the –shell option in a usermod instruction. In this instruction, you should provide the path to the shell file like /usr/bin/bash.
[user@host ~]$ sudo usermod --shell /usr/bin/bash test1Lock/Unlock the User
In case you don’t want anybody to use the particular account, you might lock it. To lock an account, the –lock option can be used in the usermod instruction with the name of a user which is “test1”.
[user@host ~]$ sudo usermod --lock test1In the same way, if you want to allow a particular user to use its system account, you should unlock the particular account using the “unlock” option in the usermod instruction with the same user name as shown in the attached instruction:
[user@host ~]$ sudo usermod --unlock test1Delete the User
To display the currently available users of your Arch Linux, try using the instruction as follows:
[user@host  ~]$ cut -d: -f1 /etc/passwd
root
bin
daemon
omar
dummy
new
blue
hell
test1
To delete the new and previously made users, the “userdel” instruction can be utilized. This command takes one or more usernames at once.
[user@host  ~]$ sudo userdel test1
[user@host  ~]$ sudo userdel hell
[user@host  ~]$ sudo userdel blue new
[/c]c
If you create a user with a related home directory, you can delete it using the –r option.
[cc lang="bash" width="100%" height="100%" escaped="true" theme="blackboard" nowrap="0"]
[omar@omar ~]$ sudo userdel -r dummy
Conclusion
The introductory paragraph explains the importance of user management in all sorts of operating systems. To support the discussion, we tried the different instructions to create the new users, modify, lock or unlock, and delete them. For this, we utilized the useradd, usermod, and userdel instructions with the –m, -p, -G, -r, -s, -l, –append, –shell, –lock, –unlock, and –expiredate options.
Article originally written by https://linuxhint.com/add_users_arch_linux/
NOTES:
You have to use -m, otherwise no home directory will be created. If you want to specify the path of the home directory, use -d and specify the path:
useradd -m -d /PATH/TO/FOLDER USERNAME
You can then set the password with:
passwd USERNAME
All of the above need to be run as root, or with the sudo command beforehand. For more info, run man adduser.
Creating a systemd service for xscreensaver
First, is to define a systemd service:
$ cat > ~/.config/systemd/user/xscreensaver.service <<EOF
[Unit]
Description=XScreenSaver
After=network.target

[Service]
ExecStart=/usr/bin/xscreensaver -nosplash
Restart=always
RestartSec=3

[Install]
WantedBy=default.target
EOF
Then,
$ systemctl --user enable xscreensaver.service
$ systemctl --user start xscreensaver.service
$ systemctl --user status xscreensaver.service
BTW it could appear to fail at first if the xscreensaver daemon is already running. In that case, do:
$ pkill xscreensaver
Then check the status again, and it should now be active.
$ systemctl –user status xscreensaver.service
Tips to Reduce Laptop Temperature
The solution is to limit the speed. When we use our laptops disconnected from the power source, the system “changes personality.” Now, the focus is not on providing maximum performance but on obtaining the maximum autonomy from our battery.
To achieve decent autonomy, the CPU speed is limited to the minimum possible, reducing CPU consumption, which, in turn, lowers its temperature and consequently reduces the time the fans need to be active, preserving our precious battery.
If you want to get the most out of your laptop’s battery on GNU/Linux, you can take a look at Slimbook Battery, a program designed by SLIMBOOK to improve the autonomy of their own laptops. It may also work on laptops from other brands, provided they are based on Intel processors.
cpupower allows us to manage our CPU more easily and even automate the parameters we want to use when our system starts.
Installation
For Arch Linux and its derivatives:
sudo pacman -S cpupowerManual Usage
First, we need to use this command to find out which speeds our CPU accepts:
sudo cpupower frequency-info
This command will give us a result like the following, where we will find the information we need:
sudo cpupower frequency-info
analyzing CPU 0:
driver: intel_pstate
CPUs which run at the same hardware frequency: 0
CPUs which need to have their frequency coordinated by software: 0
maximum transition latency: Cannot determine or is not supported.
hardware limits: 800 MHz – 4.50 GHz
available cpufreq governors: performance powersave
current policy: frequency should be within 800 MHz and 2.60 GHz.
The governor «powersave» may decide which speed to use
within this range.
current CPU frequency: Unable to call hardware
current CPU frequency: 809 MHz (asserted by call to kernel)
boost state support:
Supported: yes
Active: yes
To limit the maximum frequency of the CPU, you can use this command:


cpupower frequency-set -u 2600MHz
To set the minimum frequency of the CPU, you can use this command:
cpupower frequency-set -d 800MHz
Remember to change the frequency values in the above commands to the desired value. But do not remove the unit (MHz), otherwise, it will not work.
Daemon Configuration
The great advantage of cpupower is that it provides a systemd service that we can configure to start with the system and set the parameters we want at startup, so we don’t have to type any commands every time we turn on the computer.
First, we have to configure the service, for which we need to edit the /etc/default/cpupower file, for example:
sudo nano /etc/default/cpupower
Then, remove the hashtags (#) from the following lines and put the values you want to use. For example, my configuration is as follows:
governor='powersave'min_freq="800MHz"
max_freq="2.6GHz"
Depending on your CPU, frequency values may be different.
Pay attention to the units used to set the frequency. The file usually includes comments with details about the allowed units.
Finally, activate and start the service to make the changes effective, and these will be applied automatically every time you start the system.
sudo systemctl enable cpupower.service
sudo systemctl start cpupower.service
If you want to disable the cpupower service, you can do it like this:
sudo systemctl disable cpupower.service
sudo systemctl stop cpupower.service
If you have modified the configuration file and want the changes to take effect immediately without restarting:
sudo systemctl restart cpupower.service
Checking Your System:
Here are the commands from the ls family that serve to obtain detailed information about the hardware you have. Their operation is simple, and they obtain information through the identification of each component and the information available on the internet.
- lscpu: This command will show detailed information about the central processor in your CPU; it does not have any additional options or functionality.bashCopy code
lscpu - lshw -short: This is a general-purpose utility that reports detailed but summarized information about all the hardware installed on the system, such as the processor, RAM, storage, USB drivers, or network adapters.bashCopy code
lshw -short - lspci: This command will display a list of all the peripherals connected to the PCI ports on your PC, along with their details. You can filter the results using grep, for example:bashCopy code
lspci -v | grep "VGA" -A 12 - lsscsi: Shows information about SCSI devices connected to the system.bashCopy code
lsscsi - lsusb: Lists all devices connected to USB ports, as well as the USB controllers on the system. This helps you identify working ports and troubleshoot problematic peripherals.bashCopy code
lsusb - lsblk: Lists information about partitions on hard drives and other storage devices, including optical drives like DVD or BluRay.bashCopy code
lsblk
Additional Commands:
Apart from the ls commands described earlier, there are other very useful commands that provide more information than a simple list of components. They are more precise in showing the exact overall state of the system:
- df -H: Displays all system partitions, their mount points, and the available space on each.bashCopy code
df -H - fdisk: Equivalent to Diskpart in Windows, fdisk not only shows information about system partitions and volumes but also allows you to make modifications to them.bashCopy code
fdisk - free -m: Shows the amount of installed, free, and used RAM.bashCopy code
free -m - dmidecode: Differs from the previous commands as it extracts hardware information directly from the DMI tables.bashCopy code
dmidecode - hdparm: Shows information about SATA devices connected to the system.bashCopy code
hdparm
This article has been written based on readings from the websites: https://tecnoysoft.com/2023/03/08/como-reducir-la-temperatura-de-trabajo-de-nuestros-portatiles/ and https://hardzone.es/tutoriales/mantenimiento/informacion-hardware-linux/